...And a scary wonderful day!
Friday, October 29, 2010
Wednesday, October 27, 2010
STRATHFIELD SPRING (NOT) FAIR 2010!
*Sigh*...so where should I start?
Yes, the weather forecast:
The weather person was quite accurate with the weather report. What was predicted all occured...HOWEVER...a day later.
I had visioned a day of warm sunshine, a sea of excited locals, loud music, children with smiley faces excited by the carnival rides & Hi-5, a family day out, scrumptious food, but came to the realization as we were setting up early morning...it was not to be.
I prefer the bitter before the sweet so will report the bad first.
Due to the miserable cold & wet weather:
Now that I have the bad out of my system, it's time to report the good!
And for the children it was Banana Sundae: a light & fluffy banana cupcake with vanilla cream cheese frosting, banana chip, waffle piece, marshmallow & sprinkles, drizzled with chocolate or strawberry ice-cream topping, followed by White Rabbit's Carrot: a moist & fluffy carrot cupcake with the addition of walnuts, pineapple & coconut topped with vanilla cream cheese frosting, crushed walnuts & a sugar carrot.
Such is life....And today's another day!
Yes, the weather forecast:
- Friday 22nd of October - Warm & sunny with a late change in the evening & possible thunderstorms.
- Saturday 23rd of October - Showers temperature down to 20 degrees celcius.
- Sunday 24th of October (Spring Fair Day) - Cloudy with the occasional patches of rain.
The weather person was quite accurate with the weather report. What was predicted all occured...HOWEVER...a day later.
I had visioned a day of warm sunshine, a sea of excited locals, loud music, children with smiley faces excited by the carnival rides & Hi-5, a family day out, scrumptious food, but came to the realization as we were setting up early morning...it was not to be.
 |
| Setting up the stall with Amy (see the puddles of rain on the wooden tables) |
I prefer the bitter before the sweet so will report the bad first.
Due to the miserable cold & wet weather:
- I couldn't vblog the fair. Wanted to capture the carnival atmosphere & the day's events for those who are unable to attend (a special "Hello!" to local Aussies, my blog visitors from America & friends in Hong Kong)
 |
| So wet! |
- I couldn't erect all my sweet treats displays. We minimized it to the Christmas tree macaron tower (you can read about it here) but the rain got to it too & "O Christmas Tree! O Christmas Tree!" died in the process. The macaron shells fully soaked with rain, externally bleeding with thin streams of red & green blood (that visual would have been adequate to spook for a Halloween post!)
- I couldn't have more signage for our stall & descriptions of my sweet treats
- many stall holders had packed to leave within the first hour of setting up as the rain grew heavier with only a handful of stall holders (including us) staying to the end
- restricted more local residents to attend the fair & taste my sweet creations (take comfort in knowing any sweet treats not sold all went to good homes after closing of the fair).
 |
| A box of White Rabbit's Carrot with a sugar carrot on top |
Now that I have the bad out of my system, it's time to report the good!
- despite the cold & wet conditions I take comfort & give thanks to those who braved the weather to visit the stall
- close family & friends wanted to be customers to show support & wishing me an auspicious venture
- parents making the effort to take their children to the fair for a quick outing wearing raincoats & umbrella in hand, & making the trip a little more memorable with a sweet treat from our stall (& also Amy's complimentary colourful toffee candy!)
 |
| Mr Petite attending to a customer |
- invaluable feedback on my macarons. Our biggest hit on the day was Velvet Caramel: cocoa flavoured macaron shells filled with salted caramel winning hands down, followed by Strawberry & Cream: strawberry flavoured macaron shells filled with strawberry buttercream, & Orangette: orange macaron shells filled with orange milk chocolate ganache, with the rest on even par depending on the individual's like or dislike for coffee or chai tastes.
 |
| Families watching a performance (chairs were first laid out but quickly collected with the heavy rain) |
- invaluable feedback on my cupcakes. This category needs to be divided into two. For the adults it was Chocoholics: a chocolate cupcake topped with chocolate ganache frosting & a Lindt chocolate piece. (I changed the chocolate frosting from buttercream to ganache last minute wanting to make it more indulgent), followed closely by Red Velvet: a rich & moist chocolate buttermilk cupcake with vanilla cream cheese frosting topped with red desiccated coconut, & Caramel Latte: a moist & delicious light caramel mud cupcake with coffee buttercream frosting topped with coffee beans.
 |
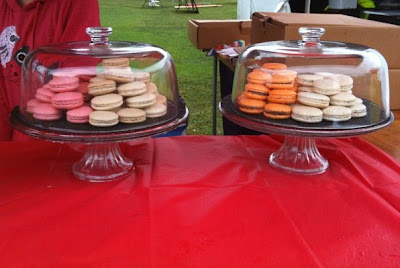
| From left to right: Strawberry & Cream, Vanilla Chai, Orangette & Hazelnut Coffee macarons |
 |
| From left to right: Chocoholics & Red Velvet cupcakes |
And for the children it was Banana Sundae: a light & fluffy banana cupcake with vanilla cream cheese frosting, banana chip, waffle piece, marshmallow & sprinkles, drizzled with chocolate or strawberry ice-cream topping, followed by White Rabbit's Carrot: a moist & fluffy carrot cupcake with the addition of walnuts, pineapple & coconut topped with vanilla cream cheese frosting, crushed walnuts & a sugar carrot.
 |
| Condensation on the cake stand glass due to the cold & wet conditions |
-
- the Council doing all they could as it was a "rain, hail or shine" event & it seems with each year they have scheduled the date of the fair to be a bit later in order to ensure spring weather conditions (but there are somethings in life that one just cannot control with the weather being one of them) & their efforts in making the event even bigger & better with each year (wonder what they'll have up their sleeves for next year's fair....)
So that's the wrap up of Spring (Not) Fair 2010.
 |
| Mr Petite & Amy keeping our spirits up on the day |
Such is life....And today's another day!
Labels:
Cupcakes,
Macarons,
Strathfield Spring Fair 2010
Wednesday, October 20, 2010
4 DAYS TILL SPRINGFAIR 2010: 4 IS FOR THE 4 STEPS IN MAKING THESE SUGAR CARROT CUPCAKE TOPPERS!
Remember my "Masculine Cupcake"? (you can read about it here)
For the Fair I wanted to transform the Masculine Cupcake into a sweet treat fit for a spring carnival.
So come with me & I'll walk you through the 4 steps in making these edible sugar carrot cupcake toppers!
Step 1: COLOURING:
Cut off 2 separate quantities of white fondant & colour one with orange & the other with green gel food colouring by adding small quantities of colouring at a time ( I used Wilton's concentrated gel food colouring) & kneading the colouring into the fondant until no more white can be seen & the desired colour intensity is achieved.
Step 2: MODELING THE TAPROOT
Tear portions reflecting the desired size of the topper you wish to make off the bulk of the coloured fondant & initially roll it into a ball, then using the side of your palms roll the fondant into a conical shape resembling the shape of the taproot (the edible part of the carrot). And allow to dry.
Step 3: MODELING THE CARROT TOP
Like modeling the taproot, tear portions reflecting the desired size of the carrot top you wish to make off the bulk of the coloured fondant & initially roll it into a ball & on a flat surface roll the ball into a long cylindrical shape.
Then flatten cylindrical strip by lightly tapping on it's surface & peel off one end from the flat surface, rolling the coloured fondant onto itself until a textured shape of the carrot top is achieved. Cut off the rolled portion & with your fingers to further shape & neaten. Allow modeled fondant to slightly dry (ie dry enough to allow handling but not too dry or you'll run into problems when assembling).
Step 4: ADHERING THE CARROT TOPS TO THE TAPROOT
Dab a small brush into water & brush the top of the taproot with an adequate volume to act as a "glue" & adhere the carrot top to the top of the taproot. And once assembled allow sugar topper to completely dry.
So what name have I given to this cupcake?
WHITE RABBIT'S CARROT - a moist & fluffy carrot cupcake containing walnuts, pineapple & desiccated coconut, topped with maple cream cheese frosting, an edible sugar carrot & a sprinkle of crushed walnuts...Mmmmmm
For the Fair I wanted to transform the Masculine Cupcake into a sweet treat fit for a spring carnival.
So come with me & I'll walk you through the 4 steps in making these edible sugar carrot cupcake toppers!
 |
| They were really fun to make. |
Step 1: COLOURING:
Cut off 2 separate quantities of white fondant & colour one with orange & the other with green gel food colouring by adding small quantities of colouring at a time ( I used Wilton's concentrated gel food colouring) & kneading the colouring into the fondant until no more white can be seen & the desired colour intensity is achieved.
 |
| I stored the coloured fondants separately in plastic zip-lock bags to prevent drying during modeling & for easy storage of any excess. |
Step 2: MODELING THE TAPROOT
Tear portions reflecting the desired size of the topper you wish to make off the bulk of the coloured fondant & initially roll it into a ball, then using the side of your palms roll the fondant into a conical shape resembling the shape of the taproot (the edible part of the carrot). And allow to dry.
 |
| I wanted the size of the toppers to be proportional to the size of my cupcakes so small pieces of coloured fondant was torn & rolled. |
 |
| I wanted a fuller & shorter taproot. |
 |
| Are the toppers taking shape & beginning to look like little carrots? |
Step 3: MODELING THE CARROT TOP
Like modeling the taproot, tear portions reflecting the desired size of the carrot top you wish to make off the bulk of the coloured fondant & initially roll it into a ball & on a flat surface roll the ball into a long cylindrical shape.
Then flatten cylindrical strip by lightly tapping on it's surface & peel off one end from the flat surface, rolling the coloured fondant onto itself until a textured shape of the carrot top is achieved. Cut off the rolled portion & with your fingers to further shape & neaten. Allow modeled fondant to slightly dry (ie dry enough to allow handling but not too dry or you'll run into problems when assembling).
 |
| As the carrot top is much smaller in size & more intricate in shape more patience & time was required. . |
Step 4: ADHERING THE CARROT TOPS TO THE TAPROOT
Dab a small brush into water & brush the top of the taproot with an adequate volume to act as a "glue" & adhere the carrot top to the top of the taproot. And once assembled allow sugar topper to completely dry.
 |
| My edible carrot cupcake toppers. |
So what name have I given to this cupcake?
WHITE RABBIT'S CARROT - a moist & fluffy carrot cupcake containing walnuts, pineapple & desiccated coconut, topped with maple cream cheese frosting, an edible sugar carrot & a sprinkle of crushed walnuts...Mmmmmm
Labels:
Carrot Cupcakes,
Carrot Cupcakes topped with Maple Cream Cheese Frosting,
Cupcakes,
Strathfield Spring Fair 2010,
White Rabbit's Carrot
Friday, October 15, 2010
Behind-The-Scenes @ S.P.T: O CHRISTMAS TREE! O CHRISTMAS TREE!
With all the preparation & activities for Spring Fair are you wondering if I’m going mad, Christmas in October?!? (..LOL..)
In addition to the sales of macarons & cupcakes our stall will also feature various festive & celebrative displays.
Take a Behind-The-Scenes look from concept to reality...& a macaron baking tutorial along the way...of one of these displays: “O Christmas Tree! O Christmas Tree!”.
Together we can create that sweet treat an occasion to remember!
In addition to the sales of macarons & cupcakes our stall will also feature various festive & celebrative displays.
Take a Behind-The-Scenes look from concept to reality...& a macaron baking tutorial along the way...of one of these displays: “O Christmas Tree! O Christmas Tree!”.
 |
| A rough sketch of a Christmas table centre piece. |
 |
| Styrofoam cone to which macaron shells are to be attached & a base to which the tower is secured. |
 |
| After measuring & calculating the number of macaron shells required it's time to weigh & age the egg whites. |
 |
| Weigh the quantities of almond meal & icing sugar. |
 |
| Process the almond meal & icing sugar until a fine powder is achieved (to obtain macaron shells with a smooth finish & surface). |
 |
| Sift the almond meal & icing sugar mix breaking up any clumps. |
 |
| Add red powder food colouring to the dry ingredients. |
 |
| As mentioned in a previous post I prefer the macarons au sucre cuit (Italian Meringue) method when baking macarons, thus enter my trusty friend "The Candy Thermometer". |
 |
| Boil the sugar syrup & wait for the temperature to reach 118 degree celsius. |
 |
| When the temperature of the syrup reaches 110 degree celsius, start whisking half of the egg whites to firm peaks. |
 |
| Pour the other half of the egg whites & scoop the meringue into the dry ingredients, & in a circular motion mix the batter around & under the bowl until... |
 |
| ...the consistency of the batter is "like magma". (Powder food colouring is highly concentrated see how vibrant the final macaron batter is). |
 |
| Pipe the shells & allow the shells to dry for 30 to 45 minutes until a dry film is formed. |
 |
| Cool macaron shells on a baking rack once out of the oven. |
 |
| Repeat the steps for green macaron shells. |
 |
| Pipe green macaron shells & allow to dry. |
 |
| Cool green macaron shells on a baking rack. |
 |
| Gently peel the shells from the baking paper. Now time to attach the red & green shells onto the styrofoam cone. |
 |
| I used tape initially to position the shells. |
 |
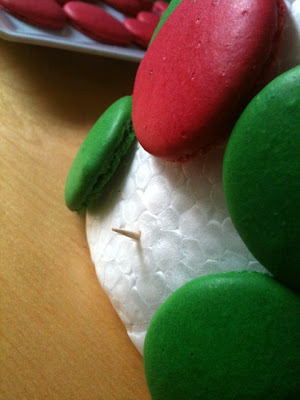
| Then used toothpicks to attach the shells onto the cone. |
 |
| Push the toothpick into the cone with an appropriate length left to allow secure attachment of the fragile shells. |
 |
| Ta-Da! A Christmas Tree Macaron Tower for a Christmas table centre piece! |
 |
| An excellent focal point to set the mood of the party... |
 |
| ... , as a conversation starter or simply to inspire. |
 |
| Continue to decorate the Christmas table with other festive ornaments & ideas. |
Together we can create that sweet treat an occasion to remember!
Labels:
Baking,
Christmas,
Display Tower,
Green,
Green macarons,
Macaron Tower,
Macarons,
Red,
Red macarons,
Sweet.Petite.Treats,
Table Centre Piece
Subscribe to:
Comments (Atom)


